Are you looking for a tutorial on how to whitewash your brick fireplace?
This whitewashed fireplace makeover is easy, cheap, and doesn’t require any more than a beginner skill level!
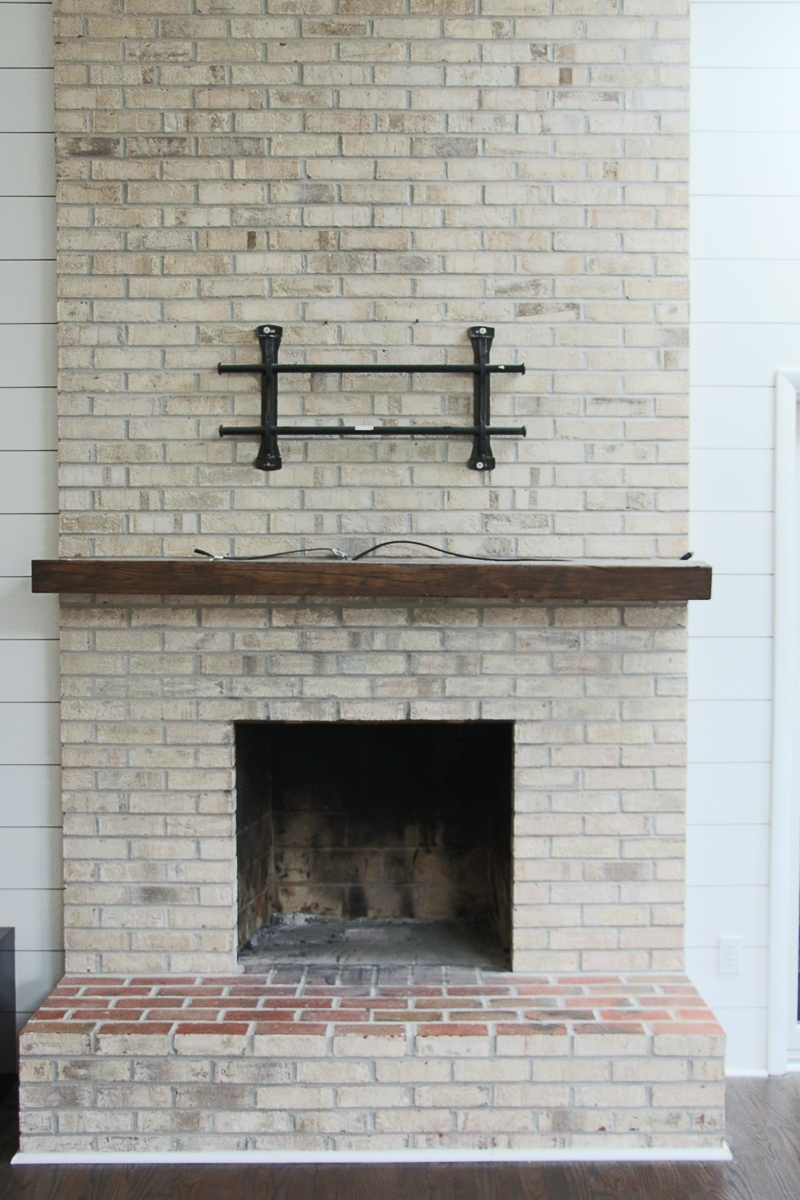
Below is the ‘Before’ photo of our fireplace before we whitewashed it.
Today I’m sharing with you what product we used, how much the makeover cost, plus a step-by-step tutorial so that you can tackle this easy DIY project yourself.
Stay tuned for our painted brick fireplace before and after photos at the end!
Revamp your dated fireplace by white washing the brick today. Let’s get started…
Disclosure: Affiliate links are used in this post, at no cost to you.
How to Whitewash Your Brick Fireplace
You know you want to whitewash your brick fireplace, but you aren’t quite sure how yet.
Let’s start off by going over the four different types of products you can use to get this whitewashed brick look.
1. Acrylic Latex Paint
Acrylic latex paint will give you a solid, painted brick look.
The main reason I did not want to use this type of paint is because it requires A LOT of prep work to the brick.
You have to clean the brick thoroughly which makes this a multi-day, multi-step process.
The other issue with this type of paint is that it only sits on the surface of the brick, not in the pores, and therefore is prone to peeling or cracking.
It also means that you will cover up the texture of the brick, which I find takes away the character.
This method is also risky because it is very difficult to remove and most likely you will never be able to restore your brick to its original, natural look.
What if you don’t like the outcome or change your mind in a few years?
2. Brick Stain
Brick stain will also give you the look of solid color, but without the long term possibility of peeling or cracking.
Stain actually seeps into the pores of the brick while still maintaining its texture.
Since the stain sets in the pores of the brick, it cannot be easily removed so this method is a much more permanent option.
Brick staining would be a better option than acrylic latex paint, but again it requires A LOT of prep work to the brick before hand.
I don’t know about you, but I really like one step, one day projects!
3. Chalk Paint
Unlike acrylic latex paint & brick stain, chalk paint boasts that no brick prep work is required.
Chalk paint is very similar to milk paint so it is difficult to decide between the two products.
Either would work for this project, but chalk paint is not as flexible as milk paint because it comes pre-mixed.
This means you can’t create the consistency of the paint yourself.
It’s a great option to have if you paint your first brick sample and you don’t like the overall look.
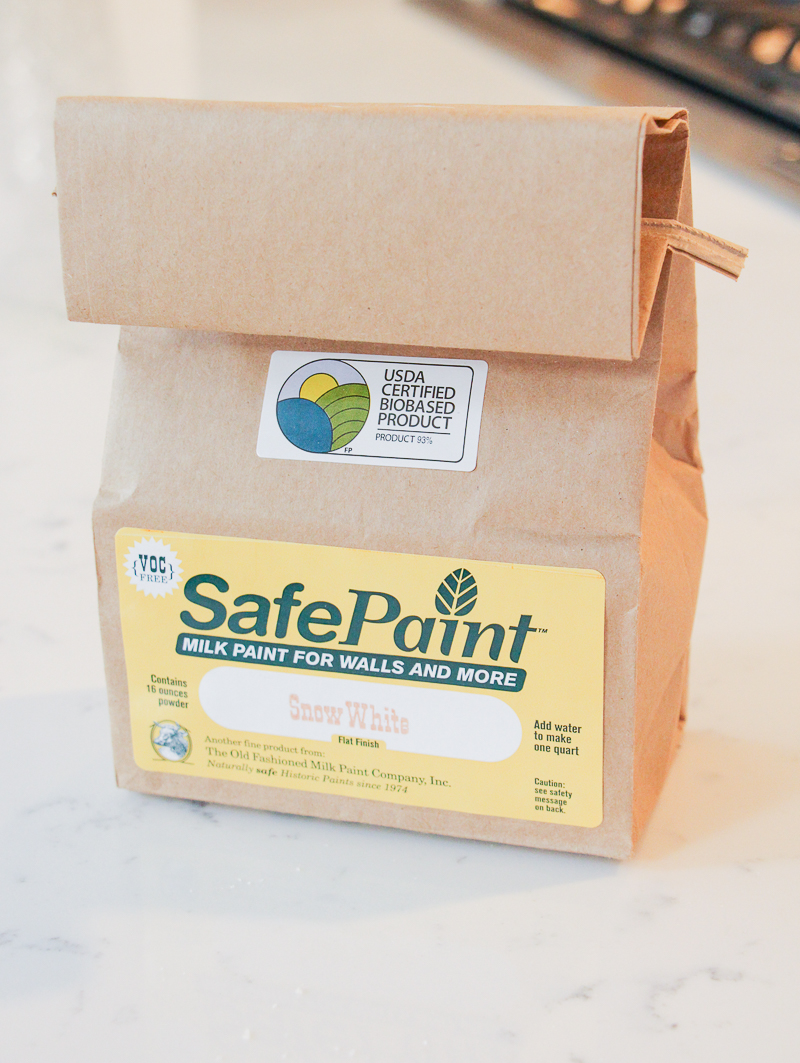
4. Milk Paint
Milk paint requires no brick prep work which means it is a one day project – YAY!
This product is in powder form, and you add water to the powder to create your desired consistency.
You can add additional powder or water to thicken or thin the paint coverage as necessary.
This makes it extremely flexible to work with and makes it very difficult for you to mess up.
It also dries very quickly (15 to 30 minutes) so if you require multiple coats you can start on the next coat very quickly.
The Milk Paint brand and finish (as shown in this tutorial) is SafePaint in Snow White by The Old Fashioned Milk Paint Co.
*Update for 2022: The package label looks different now, but is still made by The Old Fashioned Milk Paint Co. You can get this product HERE.
Whitewashing Your Brick Fireplace: What Will It Cost?
Trying to calculate what whitewashing your brick fireplace will cost?
Below is a list of the materials you will need to whitewash your fireplace. I’ve linked most of the supplies for you so you can quickly check pricing and shop everything you need!
Project Materials Used:
- Milk Paint – Quart in Snow White
- Paintbrush – 2.5″ Soft Tip Angle Brush
- Basic Sponges – 6 Pack
- Paint Stirrers – Multi Pack
- FrogTape Painter’s Tape – 2 Inch by 60-Yard Roll
- Clear Plastic Painters Drop Cloth – 9′ x 12′
- Old Tupperware with Lid
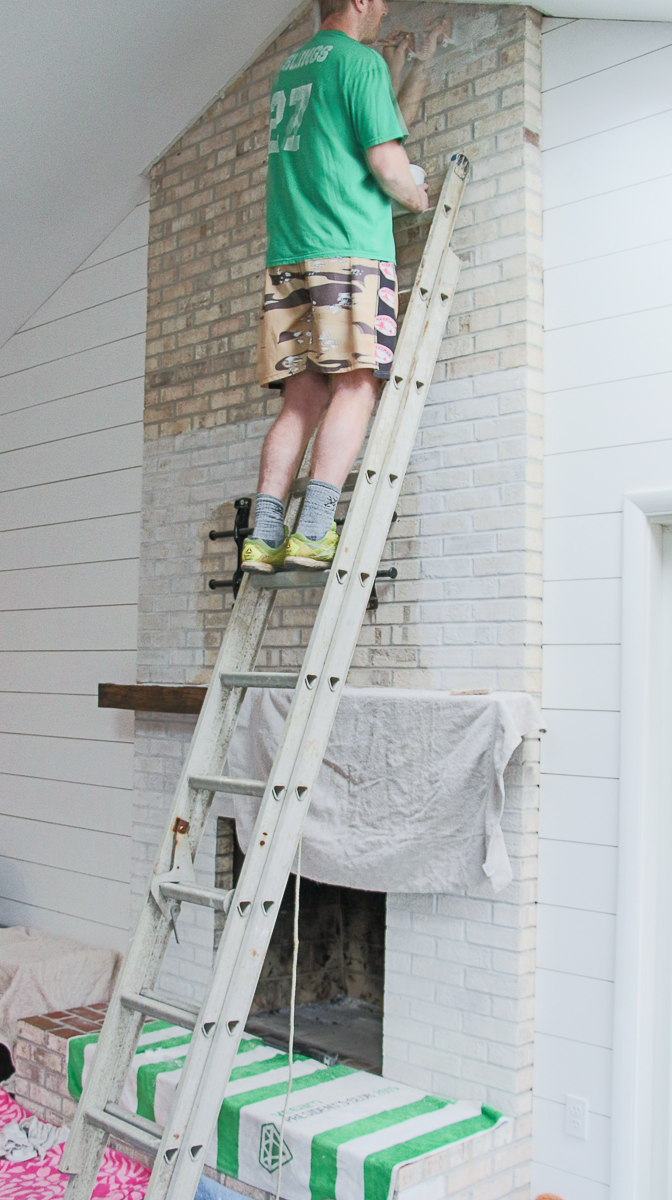
- Ladder (for taller fireplaces) or Step Stool (for shorter fireplaces)
Prices on these supplies are constantly fluctuating, but at the time of the project it cost us $58 in supplies.
Amount of Milk Paint Required:
One quart of SafePaint was enough to cover our entire 85 square foot brick fireplace.
There was 1/4 bag left to spare which we will save for any future touch ups.
For reference, below are the product available sizes and coverage limits.
- One Pint – 8 oz. powder, plus watercovers approximately 35 square feet
- One Quart – 16 oz. powder, plus watercovers approximately 75 square feet
- One Gallon – 64 oz. powder, plus watercovers approximately 300 square feet
Another tip… if you don’t already have a ladder and you can’t borrow one, keep in mind that Home Depot rents ladders for about $20/day.
We’ve done this once before and the process was very easy.
Step by Step Tutorial for a Whitewashed Brick Fireplace
There are really only 3 main steps in this tutorial on how to whitewash your brick fireplace.
We’ll walk you through everything you need to know to complete this project yourself.
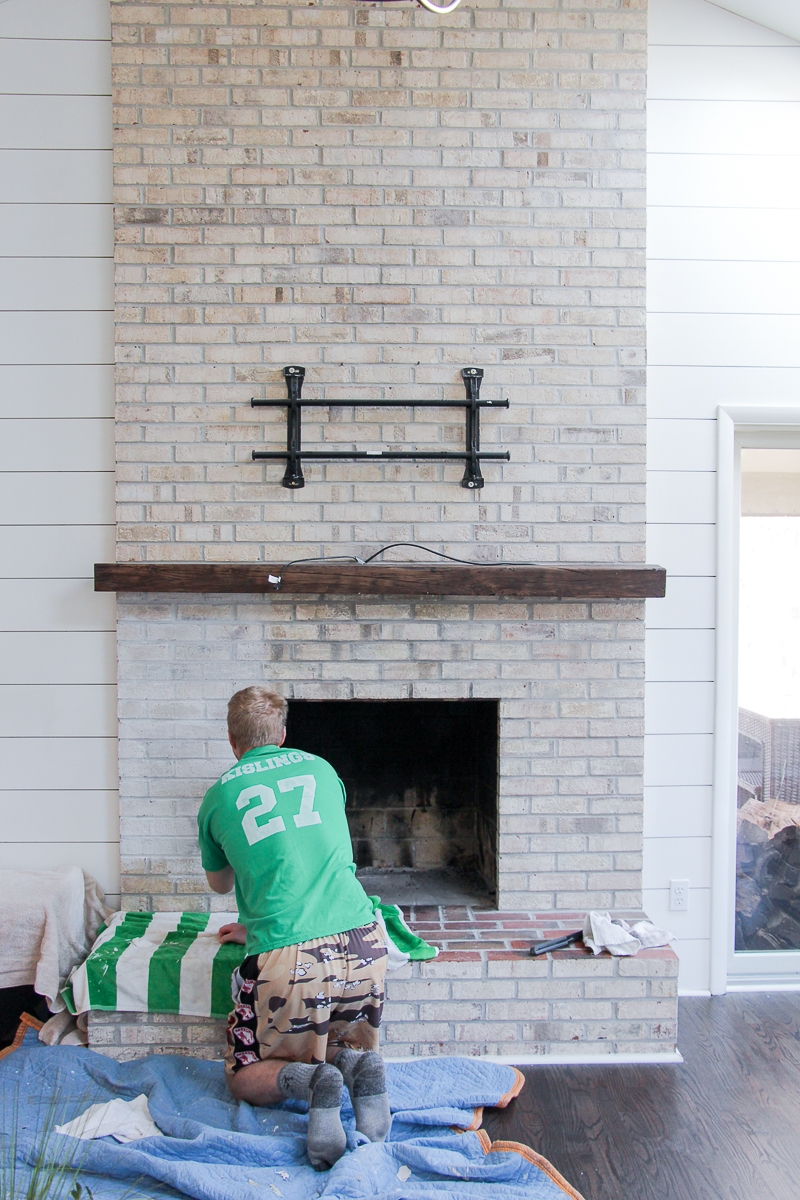
1. Set up the area
You’ll need to remove everything from your brick fireplace including your television if you have one.
If you have a mount installed, you will not need to remove it because you don’t need to paint right up to the mount. Your TV will cover the surrounding area anyway.
The majority of mantels will be difficult to remove so if you are leaving the mantel you’ll need to cover it with clear plastic drop cloth, painters tape, or old towels like we did.
Next you will also want to ensure your floors are covered up with clear plastic drop cloth at least 3 feet on both sides and in front of your fireplace.
Milk paint has a much thinner consistency than regular paint so there will be more dripping paint than your usual painting project.
We had a few paint spots drop on the floor, but they wiped up immediately with paper towels and water.
Lastly you need to prepare your adjacent wall with painters tape to protect it as you whitewash the sides of your fireplace.
You will not want any paint dripping or spraying up against that wall.
2. Prepare the Milk Paint
Milk Paint comes in powder form and you mix it with water to your desired thickness.
It shouldn’t be left out for long periods of time, so we used an old piece of Tupperware with a lid to cover it during any breaks.
You should create your first batch of paint, and test out a sample brick on your fireplace to make sure you are happy with the look before you proceed with the entire thing.
My biggest suggestion is MAKE SURE YOU MEASURE THE RATIO of your powder and water while you are making the sample.
If you adjust anything, to make it thinner or thicker, adjust and write down that ratio.
That way when you achieve the look you want on your fireplace, you’ll know the exact ratio to use to whip up another batch.
This will be the easiest way to achieve a consistent look all over.
Our ratio was 4 tablespoons powder with 2 cups of water. Try this as a starting point, and adjust as necessary.
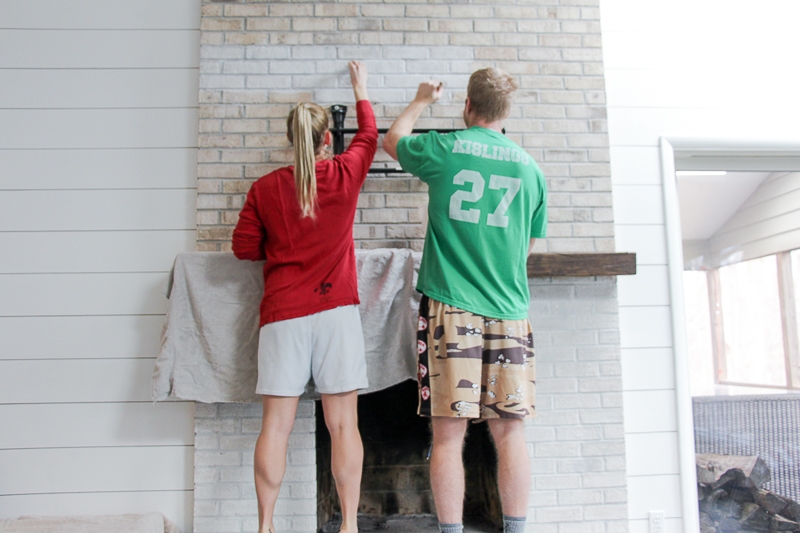
3. Paint the Fireplace
Now comes the fun part… whitewashing the fireplace!
What you will love about milk paint is that there really is no way to mess this up.
Using the brush, you will paint left to right until each brick is covered. Do this in small sections, and then use your sponge to wipe away any excess.
If you want the texture of the brick to show through partially, you can use the sponge to wipe away until you achieve your desired look.
If you have random darker bricks, you may not want to wipe away on those at all.
One person could do both steps with the paint and paint brush in each hand, and the sponge in their pocket. We chose to do it together with one person doing each step.
Our total time to completion was 6 1/2 hours. For reference, our fireplace is 6 feet wide and 13 feet tall.
Your project time will vary significantly based on the size of your own fireplace.


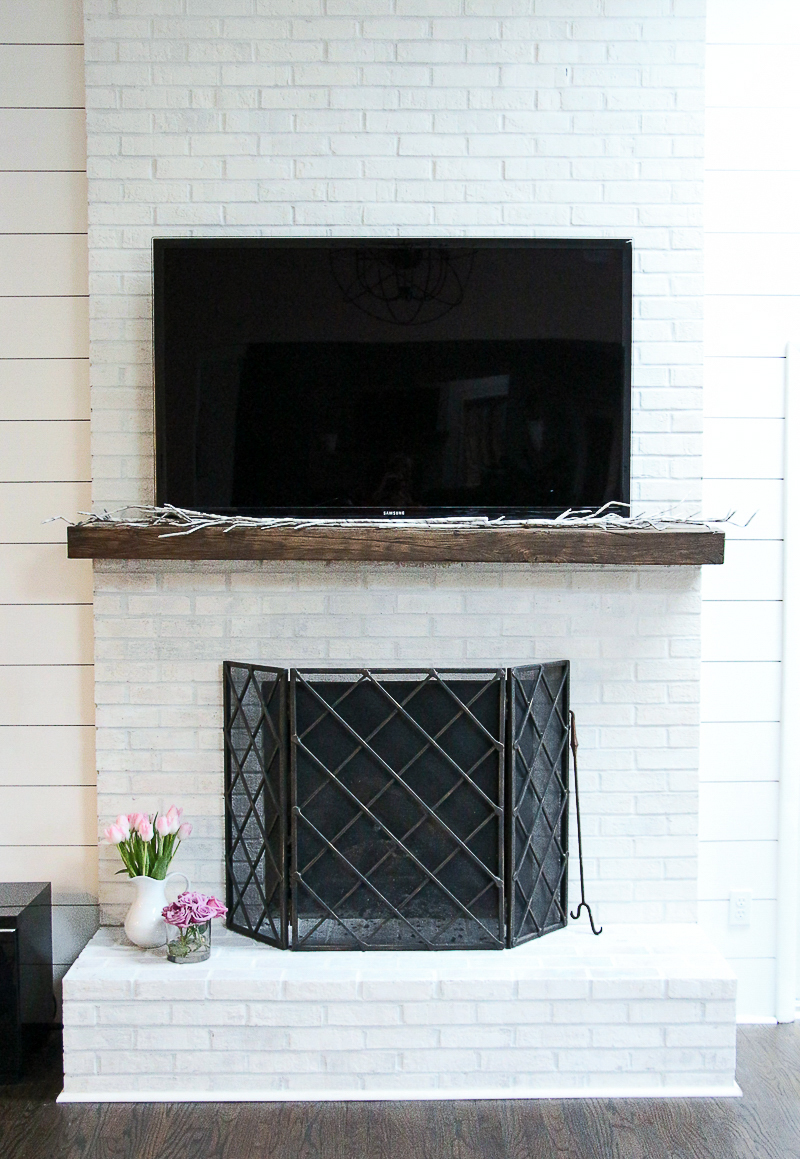
Painted Brick Fireplace Before and After
We are absolutely thrilled with the final result. I have to tell you – I was REALLY nervous about this.
After I had ordered the milk paint online, the thought of it turning out horribly wrong kept me up at night, and all of the worrying was for nothing!
This is a beginner level project, that was a bit tedious at times, but ultimately pretty hard to screw up.
We are so glad we took the leap, and it was a cheap DIY win!
Now that you know how to whitewash your brick fireplace, you can too.

Next Up:
Want to see the latest photos of our living room? Check out the full tour HERE.
PIN THIS

how has it held up?
Never chipped or anything! Looks as good as the day we did it 🙂 – Kelly
The resource grind can get intense, so players need to plan ahead or risk having their progress halted.
baseball 9
Training in the gym has always been my escape, but I wanted to take my progress seriously. I read countless articles about supplements and the role of peptides in recovery. One day, a friend recommended trying https://maxipropharma.com/bp-tropin-balkan-pharmaceuticals as part of a well-structured cycle. I was amazed by how naturally it integrated into my routine—my endurance increased, and my muscles seemed more responsive.
I really enjoyed exploring https://vincentthedog.cafe/ because it offers well-organized, verified, and trustworthy information that is easy to understand. The website features plenty of engaging articles and reliable content, making it enjoyable to browse for both new and returning visitors. One interesting fact is that dogs can recognize hundreds of words and gestures, showing just how intelligent they are. The content is presented clearly, loads quickly, and feels carefully prepared. It is refreshing to find a website where accuracy and quality come first, creating a pleasant experience from start to finish.